Exporting Data from Vflo™
Contents
Exporting parameter maps
After detailed editing of cell properties, exporting edited parameter maps may be useful. These files can be used as backup should a BOP file become corrupt, to build other BOP files, or to view parameter data in GIS.
If calibration factors have been applied, it is important to clear calibration factors before exporting parameter maps. Otherwise, uncalibrated, base parameter values will populate the exported parameter map, rather than the calibrated values used to solve Vflo™.
Step-by-step instructions
1. Export a parameter map in ASCII format.
- Select Tools | Export ASCII. From the drop down menu, select the specific parameter map to be exported (e.g., Flow Direction, Roughness, etc.) Within the Export ASCII Map window, choose the desired directory and enter a File name. The parameter map will be saved as an ESRI ASCII grid (*.asc).
Exporting rating curve, cross section, and reservoir files
Rating curve and cross section files may be exported for a single cell, or for the entire basin. Basin rating curve and cross section files contain data for each rating curve or cross section in the Vflo™ model. Reservoir stage-storage and stage-discharge curves may be exported for a single cell, only. For detailed information on rating curves, cross sections, and reservoir curves, see Loading rating curves and cross sections, as well as the tutorial Establishing rated channel cells and loading rating curves.
Step-by-step instructions for exporting single cell rating curves
The following instructions apply for rated channel cells, cross section cells, and reservoir cells.
1. Select the cell for which a rating curve is to be exported.
2. Open the Hydraulics panel.
3. Select the Export Curve ![]() tool.
tool.
- This tool is located beneath the graph(s) in the Hydraulics panel.
4. Choose a directory and file name.
- Within the Export Rating Curves window, browse to the desired save location, enter the File name in the field provided, and click Save. A tab delimited text file will be exported to the chosen directory.
Step-by-step instructions for exporting basin rating curve files
1. Select Tools | Save Rating Curve File.
2. In the Save Rating Curve File window, choose a directory and File name.
- A tab delimited text file will be exported to the chosen directory.
Step-by-step instructions for exporting basin cross section files
1. Select Tools | Save Cross Section File.
2. In the Save Cross Section File window, choose a directory and File name.
- A tab delimited text file will be exported to the chosen directory.
Exporting observed data
To export basin observed data, follow the instructions below. If observed data for a single cell is desired, export a basin observed data file and edit the file accordingly.
Step-by-step instructions
1. Select Tools | Save Basin Observed.
2. In the Save Cross Section File window, browse to the desired directory and enter the desired File name.
- A tab delimited text file containing all observed data that has been loaded to the Vflo™ model will be exported to the designated directory.
Exporting a basin map
Exporting a basin map image may be useful for presentation and display purposes. Prior to exporting a basin map, there are several options for improving the appearance of the basin image; see Changing the Vflo™ display for further details on loading background images, importing and controlling the display of shapefiles, and other display options. Basin map images will be saved as JPEG (*.jpg) files.
Step-by-step instructions
1. Before saving the basin map, be sure that the Vflo™ display represents the desired basin image.
- Zoom in or out to the desired display. The exported image will show the basin map as it is shown in Vflo™. Thus, if the Vflo™ display is zoomed to show only a portion of the basin, the image will contain only that portion, as well.
2. Select Tools | Export Basin Map.
3. In the Export Basin Map window, select the desired directory and enter a File name.
- Then, click Save. A JPEG image will be saved in the designated directory.
Exporting stage data
Distributed time specific stage data may be exported for further analysis and external use as an ASCII file. Exporting stage data is an important step in using the Inundation Analyst Vflo™ extension.
Step-by-step instructions
1. Within Vflo™, select the output cell for the upstream area that inundation images and data are desired for. Only the stage values upstream of the cell selected will be saved.
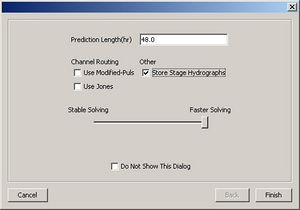
2. Solve Vflo™, selecting Store Stage Hydrographs in the Analysis Options window.
3. Select Tools | Export Time Specific Stage.
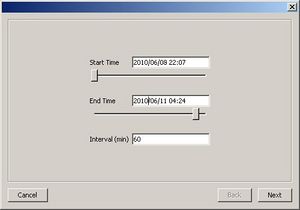
- A window requesting time and interval information will pop up. By default, the Start Time field will display the start time of the precipitation file(s) loaded in the Vflo™ model. To adjust the start time, use the slider bar provided, or manually enter a new time in the Start Time field. The time must be in the format: YYYY/MM/DD HH:MM.
- Likewise, adjust the End Time, and enter the desired output Interval in minutes. A distributed stage file will be output for each iteration of this interval, for the time period specified.
4. In the Export Time Specific Stage window, generate a new directory for stage output.

- To avoid overwriting issues, an empty folder must serve as the directory for stage output. In the Export Time Specific Stage window, navigate to the desired location of the directory, then select the Create New Folder
 button. Name the folder as desired, then click Save. To save successfully, note that the File name field must contain the address of the file, rather than just the file name, as indicated at right.
5. If the directory chosen contains files, choose to continue or cancel.
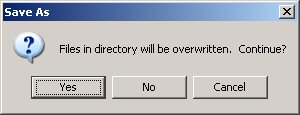
- If the directory chosen in the Export Time Specific Stage window is not empty, then a Save As window will alert the user that the files in the directory will be overwritten. If this is acceptable, select Yes. If unacceptable, select Cancel and repeat Steps 1-3, selecting a different directory.
Exporting a storm total map
A storm total map may be exported from Vflo™ for use in a GIS application. Storm total maps contain distributed rainfall accumulation data and are output as ESRI ASCII files (*.asc).
Step-by-step instructions
1. Load rainfall file(s) for an event.
2. Select Tools | Save Storm Total Map.
3. In the Save Storm Total Map window, browse to the desired directory and enter a File name.
Exporting hyetographs
Hyetographs may be exported for any cell with loaded rainfall.
Step-by-step instructions
1. Select the cell for which hyetograph export is desired.
2. Open the Precipitation panel to view the cell hyetograph.
- The Precipitation panel will only be visible if rainfall has been loaded. It is located on the left side of the Vflo™ interface in the Cell Properties pane, as described here.
3. Click on the Expand button located beneath the hyetograph.
- Alternately, right click on the hyetograph and select Open in New Window. The hyetograph will be shown in a larger Rainfall Window.
4. Select File | Save Textual Output.
- In the Save Textual Output window, browse to the desired Save in location, then enter a File name. Click Save.
Exporting hydrographs
Step-by-step instructions
1. Select the cell for which an exported hydrograph is desired.
2. Solve Vflo™.
3. In the Hydrograph window, select File | Save Textual Output.
- In the Save Textual Output window, browse to the desired save location, enter a File name, and click Save.